

How I Get a Mean Braid Out in 7 Steps
-
- November 10, 2015
 by Taneica of ShatterProofGlassDolls
Last week I posted pictures of my bad ass braid-out! After lots and lots of positive comments, I figured it’s time to share with you all how I manage to get these fantastic braid-outs time after time, fail-proof! Ok, so first, lets start with products that you’ll need.
Products needed:
1. A Moisturizing Leave In
Cantu Shea Butter Leave Conditioner, Giovanni Weightless Moisture Leave In, or Shea Moisture Shea Butter Leave In Conditioner) works best. If it’s a hell no for your hair if your were trying to keep it straight (ie: pressing) then it will work perfect for packing a moisturizing punch in your curly hair.
2. An Oil to Seal With
Darcy’s Botanicals Juicy Peach Kernel Oil or Cherry Kernel Nectar Oil, will lock in the moisture from the leave-in. Oyin Burnt Sugar Pomade or a like product will work swimmingly as well!
3. A Comb and/or Some Fingers
These will be your only utensils for this braid out. If you’re a perfectionist, the comb will provide more precise parts. If you’re tender headed…or what my Jamaican mother calls “nasty” like me (lol), you’re fingers will be less of a discomfort on your scalp!
4. 5 “Ouchless” Hair Ties
To keep the hair separate while you work on sections.
Ok, so let’s get started!
1. Part your hair in four quarters. First, part down the middle of your head, so you’ll have two big halves. Secondly, part across, horizontally, so that you have two sections in each half part, four total in you entire head!
2. Catch up each section.
3. Apply Your Leave in Moisturizer to each of the four, separated sections. I find that combing the product through works best on my very very VERY thick hair. Be sure to pay attention to your roots AND your ends.
4. When all parts of your hair are amply moisturized, grab your oil of choice and rub it on your hands as though you are going to rub someone DOWN. Aaaaah yeah. LOL! Just kidding. Anyway, rub the oil on your hands and in between your fingers. Greasy hands make for even distribution when plaiting and twisting your hair.
5. Loose each of the four sections (one by one) and put four to five plaits in each section section.
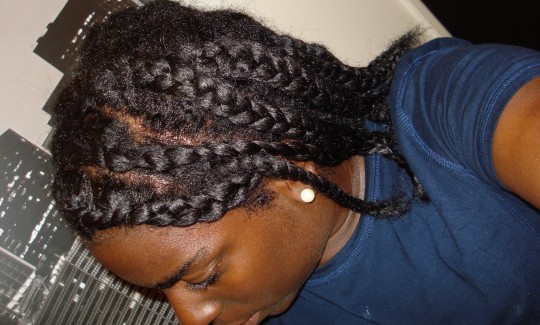
6. Do step 4 as needed for each section.
7. When all sections are plaited up, slap on a satin bonnet.

P.S. It’s okay, if you have product or “hair boogers” showing when you finish. The satin bonnet will most likely absorb the excess product while you’re sleeping, without drying your hair out!
Tips for a Perfect Braid Out:
- Keep in mind that the condition of your hair should be clean. A co-wash is fine, but I find that my braid outs hold both definition and moisture when done on damp, clean, hair.
- When you wake,ensure that your hair is completely dry. If not, be sure to blow dry on LOW heat until dry. If your hair is not completely dry, the frizz will be disastrous and the hold will be sucky.
- When your hair is all the way dry, let it down and lightly mist with finishing spray (Juices and Berries if it’s humid where you live or an oil/water base conditioning spray if it’s cool).
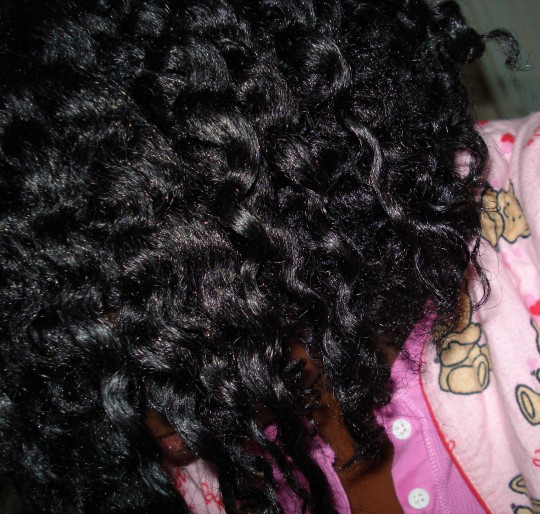
Voila! The most awesome braid out ever!
Now mind you, I realize all of our hair is different and this method won’t work for everyone, but if your have very coarse, thirsty hair like me or can’t seem to achieve the definition or moisture you want, some of these tips may be helpful! Hope this helps and happy hair flipping Dolls!
This article was originally published in March 2012 and has been updated for grammar and clarity.


